CS-115: Lab 10, Microsoft Access
You will need
one 3.5 inch diskette or use of your Wilkes server space
Preliminaries
Learn to use Microsoft Access effectively to organize and manipulate data.
The database we are going to build can be used by you to keep track of
your classes taken here at Wilkes.
Goals
-
Learn to define a database.
-
Learn to define tables within a database and enter data into them.
-
Define a validity check for data entry
-
Learn to build a form to enter data easily.
-
Learn to print a table and generate a report.
-
Learn to sort data based on the contents of a field.
-
Learn to do generate queries.
To Do
You are going to build a table to enter the courses that you taken, when
they're taken, the results, and whether they are a major requirement, core
requirement, or elective.
The name of your table will be classrecord. The fields in the table
should be:
-
Class number
-
Class Name
-
Grade
-
Semester taken
-
Year taken
-
Requirement
1. Create a database called classes on a 3.5" diskette or in your
server space.
Start Microsoft Access. Select blank database. Specify A: (or the drive
letter for your server space) and the name.
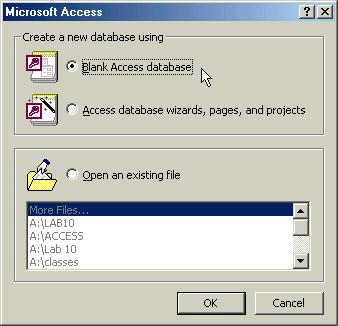

Click Create
2. Create a table called classrecord
To do this, double click on Create table in design view
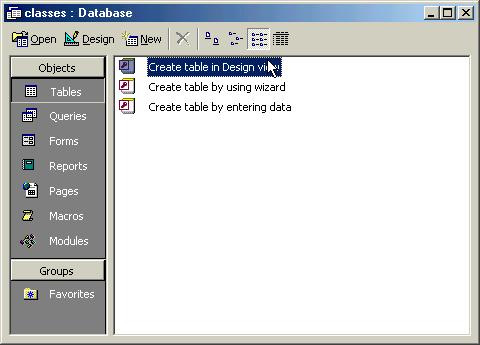
Define the following fields in the table:
-
Class number. This should be a text field.
-
Class Name. This should be a text field.
-
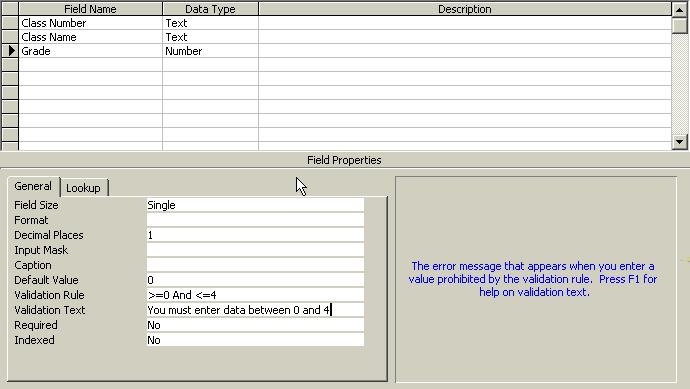
Grade. The data type of this field should be number. The field size should
be single. The number of decimal places should be 1. You must specify a
Validation
Rule for this field. This validation rule will limit the values that
can be entered for this field. the only valid values are 0 - 4.0. The syntax
of the validation rule is >=0 AND <=4.
-
Semester taken. This should be a text field. You must specify Validation
Rule for this field to limit the values that can be entered for this
field. The only valid values are sp for spring semester or fa for fall
semester. The syntax of the rule is ="sp" or "fa"

-
Year taken. The data type of this field should be number. The default size
is long integer. That is ok.
-
Requirement. You must specify a validation Rule for this field.
The only valid values for this field are M for a major requirement, C for
a core requirement, or E for elective. The syntax of the rule is ="M"
or "C" or "E".
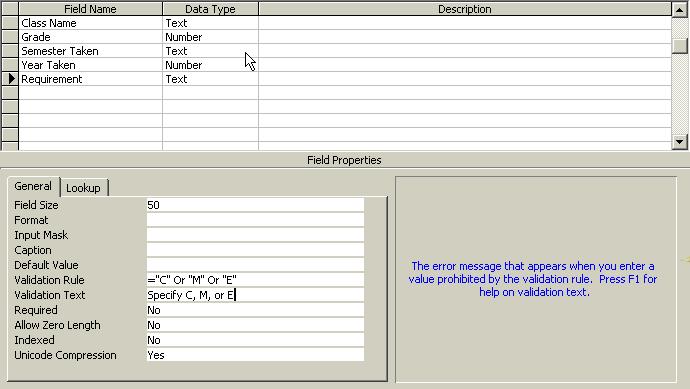
Validation Text Can be specified to provide meaningful error message
on entry of invalid data.
After entering all of the fields, you are going to close the table by
clicking on the x in the upper right corner of the table. You will be asked
if you want to
save the table, click yes. You will then be prompted for a table name,
specify classrecord.

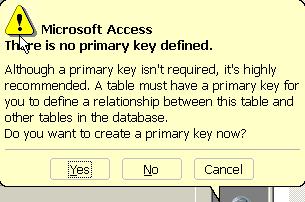
You will then be warned that you have not defined a primary key,
asking if you want access to define one for you. Remember from class
discussion that a primary key is a field in the table that uniquely
identifies each record. It is important to have a primary key. Since there
is not a field in the
table that is appropriate for a primary key, we want access to define
one for us. So, click yes.
Your table has been created in the database.
3. Create a form to enter data into classrecord
To do this, single click on the table name so that it is highlighted. Then
click on the New Object Autoform arrow. Select Auto Form.
You will then
get a form into which you can enter data.

Because everyone in the class will be printing out reports that are
identical, in order to be able to uniquely identify your data, we will
enter a dummy record with your name as the course name so that your print
outs can be uniquely identified.
Using your form, enter the following data into class Record.
| Me101 |
Your name |
4.0 |
sp |
2003 |
M |
| CS115 |
Computer Literacy |
4.0 |
sp |
2003 |
C |
| MTH110 |
CalcI |
3.5 |
sp |
2001 |
M |
| HTS110 |
History |
3.0 |
fa |
2002 |
C |
| ENG101 |
Composition |
1.0 |
fa |
2001 |
C |
| CS125 |
CS1 |
2.0 |
SP |
2001 |
E |
| MTH150 |
Statistics |
0 |
sp |
2000 |
M |
| MTH150 |
Statistics |
1.5 |
sp |
2002 |
M |
| CS126 |
CS2 |
3.0 |
sp |
2002 |
E |
| COM101 |
Communications |
2.0 |
fa |
2000 |
C |
3. Print your report.
With the table name highlighted, click on file, print.
4. Create a report and print the report
With the table name highlighted. click on New Object Autoform and
select either Auto Report or Report. Save and print the report.
5. Sort the data by Grade
Open the table in Data View. Click in the Grade field of any record.
Then click on the Sort Ascending button of the tool bar. Print the
table. Repeat the process only click on the Sort Descending. Print
the sorted table.
Do not save the changes.
6. Generate a queries.
In each query produced, be sure that all of the records are included in
the query. Using Design view, create the following queries:
-
All records such that the grade is greater than or equal (>=)3.0.
-
All records such that the course grade is equal to 4.0.
-
All records such that the course grade is less than 2.0.
-
All records such that the course was a major requirement.
-
All records such that the course was a core requirement.
-
All records such that the course was an elective.
The design view screen for query creation has two portions. The top screen
is where you select the fields for the query. The bottom is where you
actually specify the query.
Be sure to save each query
You do not have to print the queries. I will grade them by looking at
them on your diskette.
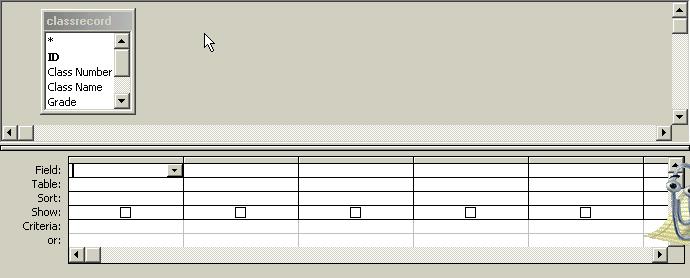
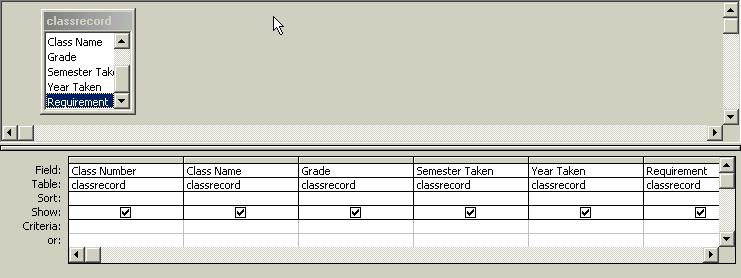
Double click on each field name in the top portion so that appears in
the bottom portion.
The Criteria line is where you specify the criteria for the query. The
first query specifies that you want all of the records such that the grade
is greater
than or equal (>=)3.0. The Screen for the first query is as follows:
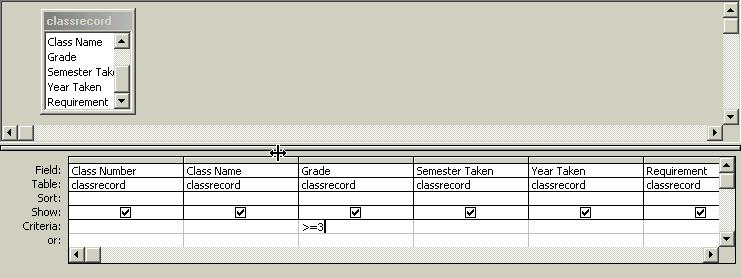
To run the query, click on the red exclamation point on the Tool Bar:

There is no Access description in your text book. Therefore, if you
are having difficulty, you can follow this
link
for
some helpful information.
What to hand in
Email me, bracken@wilkes.edu, the file containing your database. Be
sure that the subject of the email says access lab.
The following printouts:
-
Table as entered
-
Report
-
Sort in ascending order
-
Sort in descending order
Last Modified 1/14/2004
This page is copyright protected © by Barbara Bracken